
by Dr Alastair Tehan | Nov 5, 2017 | Excercise Library, Osteopathy Blog
We asked Dr Alastair Tehan (Osteopath) what are some common exercises he prescribes when dealing with shoulder injuries?
He responded:
There are many exercises and it really depends on the type of shoulder injury the person has sustained, but lets say someone has sustained an injury that has created some instability of the shoulder. The shoulder is a very complex joint that enables a very large range of motion, weakness of the shoulder muscles can often put undue stress on the shoulder capsule and ligaments. I often find due to desk based occupations with poor posture that people are often weak in their external rotators, and I feel this may predispose them to injuries in throwing sports such as cricket.
Strengthening the external rotators of the rotator cuff can not only help rehabilitate from many shoulder injuries but may also help reduce the likelihood of many injuries in the first place. The rotator cuff consists of four muscles;- Supraspinatus, Infraspinatus, Teres Minor, and Subscapularis muscles. These muscles are endurance muscles and as such we often need to hold contractions, or perform repetitive actions with relatively light weights. The risk of working with heavier weights is not only damaging to these muscles but often just sees these muscles being bypassed for larger muscles to perform an action. With many of the rotator cuff exercises I’ll often start patients with about 3 sets of 12-15 repetitions, and build up to 5 sets of 25-30 repetitions.

The towel Squeeze – Isometric Rotator Cuff Activation.
The towel squeeze:
This is an exercise I’ll often start my patients with, it requires no equipment or gym memberships and in itself can often alleviate a lot of their pain.
Often the first step is getting the patient used to an externally rotated position and then activating the rotator cuff muscles. Placing a towel under the armpit, the patient will bend the elbow to 90 degrees and then turn the arm outwards with the palm facing forwards.
Be sure not to cheat and start to rotate your upper body, if you’re concerned this may be happening you may choose to put your back against the wall. Once you’ve reached a comfortable externally rotated position gently drawing the elbow into you side and holding for about 10 seconds and repeat 3-6 times.

Dumbell External Rotations (Step 1)
Dumbell External Rotation (Step 2)
The Dumbell External Rotation exercise:
I’d like to stress that this exercise can also be done without purchasing equipment as I often get patient to perform it using a can of tomatoes or something to that effect.
A patient will lay on their side usually with a pillow under their head to assist with maintaining neutral alignment in their neck. With their elbow of the top arm bent to 90 degrees they hold a weight often between 500 grams up to about 3kg. Gently externally rotating at the shoulder and lifting the hand away from the ground. Its really easy to feel if you are cheating with this one as when your body starts to rotate backwards you’ll feel like you want to roll onto your back. Slowly lowering the weight again and repeating anywhere between 3-5 sets of 12 to 30 repetitions depending upon your current status.
Theraband External Rotations

Start Position

End Position
Theraband External Rotation exercise:
1. Secure Theraband to the door at approximately your own elbow height. If you don’t have a door anchor you may wish to tie the theraband into a knot that you can close on the other side of the door. Warning door handles can be dangerous.
2. Place a folded towel between your elbow and your torso on the side of the shoudler you are trying to strengthen, this will act as a feedback mechanism that will avoid cheating that can occur if you abduct or draw your elbow away from your side.
3. Bending the elbow to 90 degrees and grasping the theraband, stand side on to the door so that the Theraband is travelling across your upper abdomen.
4. Being mindful of your posture gently externally rotate / turn your upper arm out, once again avoiding rotation through the torso and avoiding any excessive wrist flexion or extension, try to keep the wrist neutral.
Start with about 3 sets of 12-15 repetitions, and build up to 5 sets of 25-30 repetitions.
Using a Theraband and a door anchor is a great portable way in which to train the muscles of the rotator cuff and shoulder. I often find I give this to people who need to travel a lot. The beauty about Theraband is not just its portability but I find it a little better than dumbbells as it is very easy for the patient to increase or decrease the load. Patients simply hold the band with more or less tension, or even doubling it over for more resistance. A door anchor is a worthy investment as it prevents injuries that can sometimes occur if a door handle is used and is not securely attached to the door.
At our clinic we sell 2 meters of theraband for about $10 and Door anchors are about $15.
** Please note whilst this article includes some general information, shoulder injuries are quite complex and a thorough diagnosis is always necessary before determining the exercises that are the best course of action. If you have a shoulder injury and are seeking information, the best thing to do is book with one of our Osteopaths for a more tailored exercise regime.
by Dr Eliska Axford | Nov 5, 2017 | Osteopathy Blog
Dr Eliska Axford (Osteopath) is presenting on women’s health, stress and Osteopathy as part of our women’s health and wealth seminars. In her lecture she discusses the physical manifestations of stress within the body and she gets quite technical regarding hormones such as cortisol. We asked Eliska to provide us with some tips to help reduce stress within the body.
Eliska’s 5 tips to reduce stress in your body:
1. Relaxing: When you’re driving, and you stop at a set of lights, drop your elbows and relax your shoulders.
2. Time-Out: Take breaks from your workstation regularly, I suggest every 30-45 minutes to reduce the chance of falling back into “slouchy spine”. Take a walk to the water fountain, around the office or to the bathroom to get your blood pumping again.
3. Breathing: Take 3 deep belly breaths, counting to 5 on the way in and 5 on the way out.
(See below for a description of a belly breath and why it may help reduce your stress)
4. Replenishing: ensure you drink 2L of water per day – but don’t fill up a big drink bottle, you’ll tend to drink more if you have a small 200ml cup on your desk and try to drink one glass every hour, it only takes a few gulps.
5. Stretching: particularly for those areas of the body that are compressed or under tension, two of my favourite ones are a lateral neck stretch and a pec stretch, both of which I find people benefit from doing intermittently throughout the day especially if they are using computers, electronic tablets or phones a lot.
Stretch 1. Lateral Neck Stretch:

This is a general neck stretch that is often suitable when you’ve been at the desk on the computer.
Aim: It targets the scalene and your upper trapezius muscles where many people experience tension.
Caution: If you have a specific injury you should consult your Osteopath before attempting any stretches or exercises.
Method:
Step 1 – Gently sitting on your hand, keeping your shoulders down and level.
Step 2 – Laterally bend your head to the right.
Step 3 – Take the left side of your head in your right hand. Gently draw your head and neck to the right. Hold 20-30 seconds and gently return to the centre. Repeat for other side.
Stretch 2 – Chest Stretch.
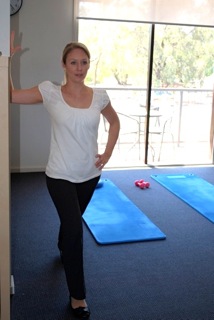
This is a general chest stretch that will stretch the pectoral muscles and aims to encourage an upright posture (helps to avoid the slouchy posture). If you are a regular mouse user, you may choose to spend a little more time doing this stretch on the side you use your mouse on.
Caution: If you have a history of shoulder dislocation or instability this may not be suitable for you, please consult your Osteopath for clarification.
Method:
Step 1 – Standing near the edge of a wall or in a door way bend your elbow to 90 degrees and place your palm and forearm against the edge of the wall as in the picture above.
Step 2 – Place the same leg forward as the arm you are stretching. Gently moving forward you should start to feel a stretch in the chest area.
Note:
– If you experience any pain in the shoulder joint with this stretch, stop immediately and consult your Osteopath.
– Lightly contracting your abdomen can reduce the torsional or rotational forces into you mid and lower back.
Belly Breathing:
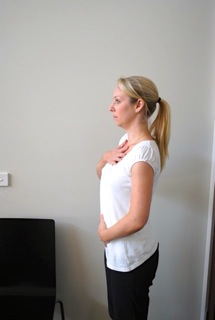
To perform a belly breath you may find it beneficial to place one hand on your chest and one hand on your belly.
Using the hand on the chest area you can monitor and try not to move the chest whilst performing these breaths.
The idea with a belly breathing is to use your diaphragm muscle under your rib cage and to avoid using the scalene muscles in your neck. The scalene muscles are often over worked and can contribute to neck tension.
At times of emotional stress and meeting deadlines we often find ourselves at a desk performing any number of tasks. When you are seated at a desk especially after a big meal or when you are pregnant your diaphragm may be compressed and thus you often revert to using those scalene muscles in the neck again to assist with respiration. Just performing this simple task can often see people experience a reduction in neck tension and thus they will often cope better with a whole range of stress issues.
If you have any further questions regarding Eliska’s tips to reduce stress or feel you may benefit a consultation with Eliska please don’t hesitate to contact our receptionist to arrange an appointment. Ph. (03) 9431 5773 or info@kxar1worxo.wpdns.site
by Dr Jessica Bowman | Nov 5, 2017 | Excercise Library
Patellofemoral Pain Syndrome
Author: Dr Jessica Bowman (Osteopath)
We asked Dr Jessica Bowman if she could tell us a little about a common knee complaint, here’s what she had to say.
What is patellofemoral pain syndrome?
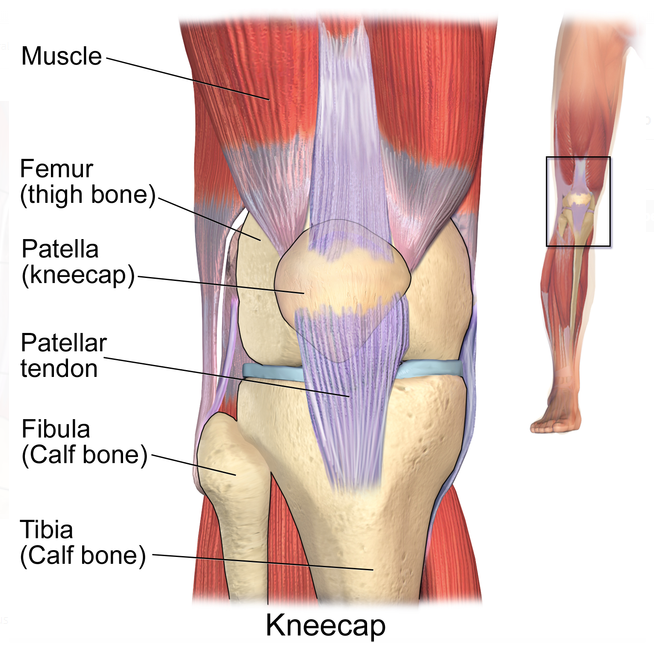
Patellofemoral pain syndrome is one of the most common causes of pain behind or around the kneecap. It is usually the result of abnormal tracking of the kneecap through the femoral groove as the knee flexes and extends, making it rub against the femur. This can cause joint irritation and, eventually, degeneration of the underside of the patella.
What causes it?
A number of factors can cause aberrant tracking of the patella. Usually, there exists a tightness of the Vastus Lateralis, which pulls your patella outwards, in combination with a weakness of the hip stabilisers and the Vastus Medialis, which usually pulls your patella up and inwards. This results in the kneecap being pulled to the outside of the knee.
Common reasons for a weak Vastus Medialis include overuse, injury, or disuse.
What are the symptoms?
People with patellofemoral pain syndrome tend to experience pain around or behind the kneecap. This is especially apparent with activities requiring the extremes of knee flexion, such as kneeling, squatting, running, or ascending/descending stairs.
What can my osteopath do to help?
The aims of treatment for patellofemoral pain syndrome treatment are to ease pain and inflammation, maximise circulation for fast healing time, and to correct the causative underlying strain. With these in mind, your osteopath will:
- Restore biomechanical balance to the lower extremity, pelvis and lumbar spine.
- Tape the knee to support patellofemoral realignment.
- Diagnose any weak musculature present and prescribe a range of stretching and strengthening exercises to be performed by the patient at home.
- Provide advice on appropriate pain management, such as the use of a simple pain killer and avoidance of exacerbating activity.
From my experience approximately 90% of patients with patellafemoral pain will be pain-free within 6 weeks of beginning treatment.
What kind of self-management strengthening and stretching exercises can I expect?
Your osteopath will tailor a stretching and strengthening program to your individual needs, however some frequently prescribed exercises include:
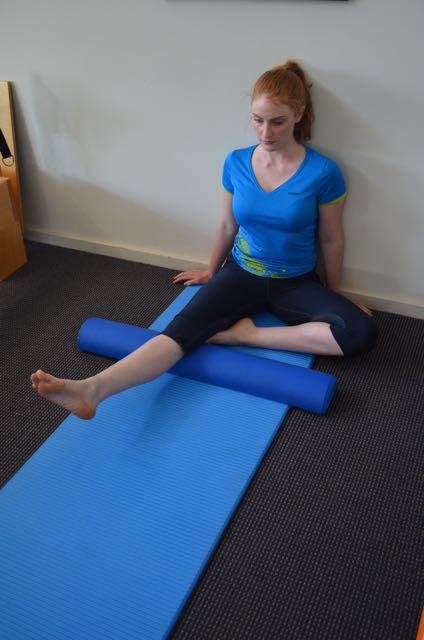
1. Foam roller knee extension: 3x sets of 15 repetitions each side
- Sit on the floor with your back supported against a wall.
- Place a foam roller (or rolled up towel) underneath the lower thigh/knee.
- Turn the toe out approx. 30⁰.
- Squeeze the front of the thigh- focussing on the VMO- to lift the heel off the floor and push the back of the knee into the towel.
- Return to the start position and repeat.
- Repeat on opposite side.

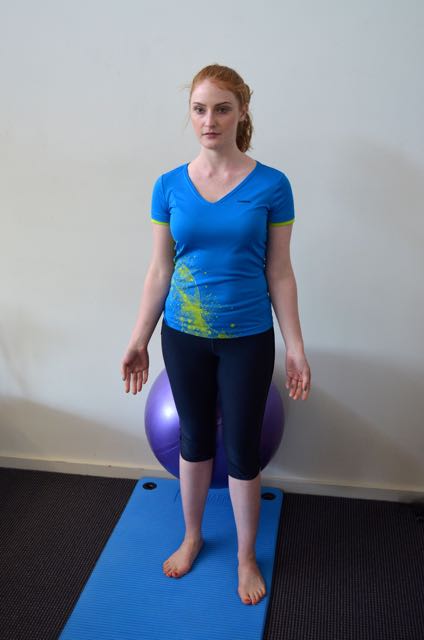
2. Swiss Ball Squeeze: 3x sets of 15 repetitions each side
- Position feet shoulder width apart, with the swiss ball behind one knee such that it creates a slight bend in it.
- Contract your Transversus Abdominus (suck belly button in towards spine) and stand tall.
- Gently extend the knee into the ball, focussing on squeezing the VMO.
- Return to the start position and repeat.
- Repeat on opposite side.
3. Toe- out lunge: 3x sets of 12 repetitions each side
- Position one foot at a comfortable distance in front of the other. Each foot should be in front of the corresponding hip.
- Turn the toes of the front foot 10⁰ away from the midline of the body.
- Contract your Transversus Abdominus (suck belly button in towards spine) and stand tall.
- Maintaining approx. 80% of the weight on the front foot, bend the front hip and knee into a lunge. Hold on to something for support if required.
- Return to the start position and repeat.
- Repeat on opposite side.


4. Clams: 3x sets of 20 repetitions each side
- Lie on your side and bend your knees in front of you so that your thighs are perpendicular to your hips and shoulders, which should be in a straight line.
- Rest your head on your bottom arm. Place your top arm on the floor in front of your chest for stability.
- Raise the top knee towards the ceiling, allowing your hip to rotate in its socket. Keep the heels together, and only open the knees as far as you can go without allowing the pelvis to tilt forward or backward.
- Slowly and with control, bring your knee back to the start position and repeat.


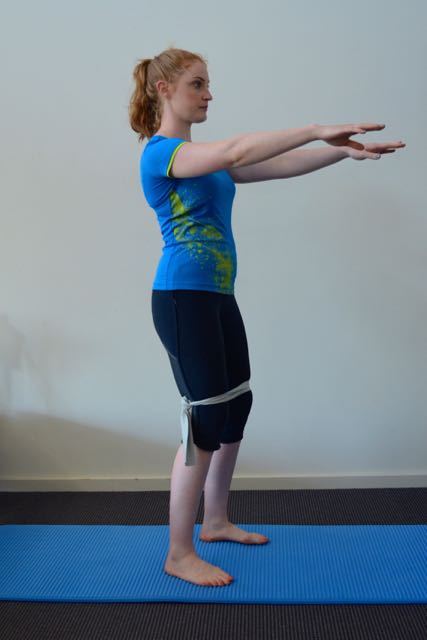
5. Theraband Squat: 3x sets of 12 repetitions
- Step through the theraband loop and wrap it around or just above the knees.
- Contract your Transversus Abdominus (suck belly button in towards spine) and stand tall.
- Simultaneously bend at the hips and knees- being careful not to slump through the thoracic spine- and squat as if sitting into a chair. The head should remain facing straight forward, and the knees should track over, but no further than, the toes.
- The movement should end as the angle at the knee reaches 90⁰. Rise and repeat.
- Stand with the feet shoulder width apart, such that all slack is taken out of the band.

6. Hamstring Stretch: Hold 30secs-1min each side
- Standing up, place one heel on a raised surface with the knee slightly bent.
- Contract your Transversus Abdominus (suck belly button in towards spine) and stand tall.
- Lean forward from the hips- without slumping forward through the thoracic spine- until a slight stretch is felt in the middle of the hamstring muscle belly (if you feel it behind the knee, you’ve bent too far forward).
- Accentuate the stretch by gently straightening the knee.
- Rise and repeat on the opposite side.


** Please note whilst this article includes some general information, patellofemoral pain can be quite complex. A thorough diagnosis is always necessary before determining the exercises that are the best course of action. If you have knee pain and are seeking information, the best thing to do is book with one of our Osteopaths for a more tailored treatment and exercise regime.

by Dr Jessica Bowman | Nov 26, 2016 | Osteopathy Blog
Author: Dr Jessica Bowman (Osteopath)
Experiencing recurrent pain down the outside of your hip? You could be suffering from Trochanteric Bursitis. We asked Dr Jessica Bowman if she could tell us a little about this condition- it’s more common than you would think!
Bursae are sack-like cavities located between bony or muscular surfaces in the body where friction may occur. They act to minimise this friction, as well as absorb shock. Trochanteric Bursitis occurs when either of the bursae overlying the greater trochanter of the femur (the bony part you can feel at the widest point of your upper thigh) becomes inflamed.
Trochanteric Bursitis is relatively common, accounting for approximately 1.8 patients per 1000 in primary care. It occurs most frequently in females, as well as those with weakness of the hip abductors (such as the Gluteus Medius and Minimus), inflammatory conditions of the hip (such as osteo- or rheumatoid- arthritis), and those who have recently suffered a trauma or direct impact to the outside of the hip.
Trochanteric Bursitis usually presents as pain and pinpoint tenderness behind or over the outside of the greater trochanter. Pain may radiate down the lateral thigh to the knee, and is aggravated by:
- Lying on the affected side;
- Standing following a prolonged period of sitting;
- Climbing stairs, walking, or cycling.
If your osteopath suspects you may have Trochanteric Bursits, they may refer you for imaging such as Ultrasound or X-ray to assess the severity of the condition and rule out any factors which may complicate recovery, such as a tear of the underlying gluteal muscles.
Once diagnosis is confirmed, osteopathic treatment of this condition involves:
- Restoration of biomechanical balance to the lower extremity, pelvis and lumbar spine;
- Taping of the hip to support the underlying musculature;
- A prescribed strengthening regime for the pelvic bowl and lower extremity to restore function to the hip and prevent symptom recurrence. Some simple, commonly prescribed exercises include:
- Gluteus Medius + Minimus activation using wall:
- Find a wall and position your feet as close to it as you can comfortably without toppling over.
- Raise your inside leg such that the thigh is parallel to the floor, forming a 90⁰ angle both with your torso and your lower leg.
- Contract your core by sucking your belly button in your towards spine and stand tall. Breathe as naturally as you can throughout this exercise.
- Gently push your inside knee into the wall. You should feel your outside Gluteus muscles contract.
- Hold this contraction for a count of 5-10.
- Clamshells:
- Lying on your side, bend your knees up in front of you so that your thighs are perpendicular to your hips and shoulders, which should be in a straight line.
- Rest your head on your bottom arm, or you may wish to rest your head on a pillow for neck support. Place your top arm on the floor in front of your chest for stability.
- Contract your core by sucking your belly button in your towards spine.
- Raise the top knee towards the ceiling, allowing your hip to rotate in its socket. Keep the heels together, and only open the knees as far as you can go without allowing the pelvis to tilt forward or backward.
- Slowly bring your knee back to the start position.
- Theraband Bridges:
- Laying on your back, support your head with a pillow.
- Bend the knees up such that the heels are in line with the hips.
- Push the knees out into the band. Your knees should now be in line with your heels and hips.
- Breathe in and contract your core by sucking your belly button in your towards spine.
- As you breathe out, peel your sacrum and spine up off the floor towards the ceiling, vertebrae by vertebrae.
- Breathe in, and again, vertebrae by vertebrae, lower the spine back down to rest on the floor. Remember to keep the core activated and the knees pushed out into the band (try to keep them equidistance apart) throughout this movement.
Your osteopath will also discuss simple management strategies with you, such as:
- Avoidance of aggravating activities;
- Avoidance of massage or foam rolling directly over the affected area, as well as certain stretches;
- The use of a simple anti-inflammatory for the management of pain, if required;
- And in severe cases, the possible referral for an ultrasound-guided corticosteroid injection into the bursa.
Most patients with Trochanteric Bursitis experience restored hip function within 6-12 weeks, though naturally this depends on the severity of the complaint and the overall health of the patient.
If you think you might be suffering with symptoms of Trochanteric Bursits or some type of hip pain, perhaps you should book an appointment with one of our friendly practitioners. Don’t hesitate to call and speak with one of our lovely receptionists to secure a time! 03 9431 5773
Please note whilst this article includes some general information, hip pain can be quite complex and its causes numerous. A thorough diagnosis is always necessary before determining the exercises that are the best course of action. If you have hip pain and are seeking information, the best thing to do is book with one of our Osteopaths for a more tailored treatment and exercise regime.
Author: Dr Jessica Bowman (Osteopath)

by Dr Jessica Bowman | Nov 18, 2016 | Osteopathy Blog
With the start of the cricket season, we see a huge spike in rotator cuff injuries. We asked Dr Jessica Bowman if she could tell us a little about these- here’s what she had to say.
Author: Dr Jessica Bowman (Osteopath)
The shoulder joint is relatively unstable, relying on a sling of muscles collectively known as the ‘rotator cuff’ to re-enforce its lack of bone-on-bone contact. These muscles- Supraspinatus, Infraspinatus, Teres Minor, and Subscapularis- are quite unique in that they act to both stabilise and mobilise the joint. This can however leave them vulnerable to irritation, strains, and tears.
The symptoms of a rotator cuff injury vary, but typically manifest in pain over the outside of the shoulder, around the deltoid region. Pain may be referred up the neck, or down the arm as far as the hand. Symptoms are usually aggravated by overhead work or lying on the sore side, and may be accompanied by clicking or snapping sensations.
If a rotator cuff injury is suspected, your osteopath will perform a specific set of orthopaedic tests in order to confirm the diagnosis. They may also refer you for imaging such as X-ray or ultrasound to rule out any factors which may complicate recovery, such as an accompanying bursitis.
Most minor rotator cuff injuries are successfully treated within 6-8 weeks, though naturally this differs with the severity of injury and overall tissue health.
Osteopathic treatment aims to ease pain and inflammation, increase circulation, and increase functional capacity of the shoulder joint. To this end, your osteopath will often apply gentle mobilisation and stretching techniques, as well as various soft tissue therapies to the shoulder and surrounding joints. If they determine a biomechanical deficit or weakness to have predisposed you to your injury, they may also prescribe a range of exercises to assist recovery and prevent symptom recurrence.
Your osteopath will tailor a stretching and strengthening program to your individual needs, however some frequently prescribed exercises include:
- Weighted Pendulum Swing:
- Position yourself side-on to a table or chair, holding a 1kg dumbbell in the hand of the injured arm.
- Contract your Transversus Abdominus (suck belly button in towards spine).
- Gently hinge forward at the hips, using the uninjured arm for support.
- Let the weighted arm hang down, and gently move it in a figure 8 motion. This motion should only be performed within a pain free range.
- Theraband Resisted External Rotation:
- Use your Theraband anchor to secure your band in a door at elbow height. Alternatively, you may simply tie a knot in one end of the Theraband and shut in a door.
- Stand side-on to the door and hold the theraband in the hand furthest from it with your palm up.
- Contract your Transversus Abdominus by sucking your belly button towards your spine and stand tall.
- Lock elbow in towards side, and move hand away from midline of the body.
- Return to the start position and repeat.
- Repeat on opposite side.
- Theraband Resisted Internal Rotation:
- On completion of the above exercise, stand side-on to the door with the Theraband in the hand closest to it.
- Contract your core by sucking your belly button towards your spine and stand tall.
- Lock elbow in towards side, and move hand towards the midline of the body.
- Return to the start position and repeat.
- Repeat on opposite side.
NB: A door anchor is a worthy investment as it prevents injuries that can sometimes occur if a door handle is used and is not securely attached to the door. At Gateway, we sell 1 metre of Theraband for around $5 and door anchors for $15.
If you’re suffering from any kind of shoulder pain at the moment, call and speak with one of our friendly receptionists to arrange an appointment. One of our experienced osteopaths will assess you and provide you with a tailored management plan! 03 9431 5773
*Please note whilst this article includes some general information, shoulder injuries are quite complex and a thorough diagnosis is always necessary before determining the exercises that are the best course of action.
Author: Dr Jessica Bowman (Osteopath)

Recent Comments